I’ve now been blogging and web developing for over a decade, including creating and building this website. During this time, I’ve tried numerous email marketing solutions, including Aweber, Mailchimp, Get Response, and Sendgrid. It’s not that these services didn’t work okay, but they eventually became too costly for my rapidly growing email list (over 70K). The truth is I’m just too damn cheap to willingly shell out much more than $50 / month for email marketing, especially if I can get the features I need at rock-bottom cost.
Mailpoet: A WordPress Email Marketing Plugin
After using Get Response for a couple years and paying about $250 per month (which at the time was still far cheaper than either Aweber or Mailchimp), I decided to explore other options. Fortunately, I stumbled across a WordPress plugin called Mailpoet that had over 300K installs and superb reviews. I bought the premium version of Mailpoet 2 (which you need for lists with more than 2000 subscribers), which only costs $99 per year, and began using it with a third-party SMTP provider, Sendgrid, which served me quite well for a year or so. I found Mailpoet’s customer service to be very responsive whenever I needed help troubleshooting.
Mailpoet + Amazon SES: The Cheapest (& Best) Solution
As my email list continued to expand, however, my Sendgrid charges started exceeding $100 per month. Having heard good things about Amazon Simple Email Service (SES), especially its reputation for being far and away the cheapest email marketing solution (works out to roughly $10 per 100,000 emails sent with no monthly fee), I decided to give it a try.
Unfortunately, I struggled to find any information at all about how to use Amazon SES in conjunction with Mailpoet 2. I think this is partly due to Mailpoet’s promotion of their new email service, Mailpoet 3 (which is not nearly as affordable as the option I’m outlining in this article) as well as some sort of agreement they might have with Sendgrid. Regardless, I was able to work out the proper configuration and am happy to share it with you in this post.
Mailpoet has plenty of good general set-up instructions and responses to FAQs, so we will not be reviewing those things here. My primary objective is to explain how to use it with Amazon SES. With the possible exception of bounce handling, your total set-up time will probably take less than an hour. If you’re unfamiliar with adding DNS records, it may take a little longer, but DNS instructions can usually be found with a simple Google search.
Mailpoet 2 + Amazon SES Set-Up / Configuration
Step 1: Sign up for an Amazon SES account. Amazon has many different web services under the Amazon Web Services (AWS) umbrella. Consequently, signing up through AWS affords you access to all sorts of services, including their Simple Email Service (SES). Once you’ve signed up and logged into to your AWS console, simply locate and click the Simple Email Service (SES) link.
Step 2: Enter your “From” email address. This is the email address you want people to see when viewing the “From” portion of your emails (mine is aj@personalityjunkie.com). You will enter this address in two places:
- In your Mailpoet Dashboard: Settings > Basic > Sender of Notifications
- In your SES Dashboard: Identity management > Email addresses
Step 3: Verify your From email in SES. When you click the email address you added in Amazon SES, Amazon provides instructions for verifying it.
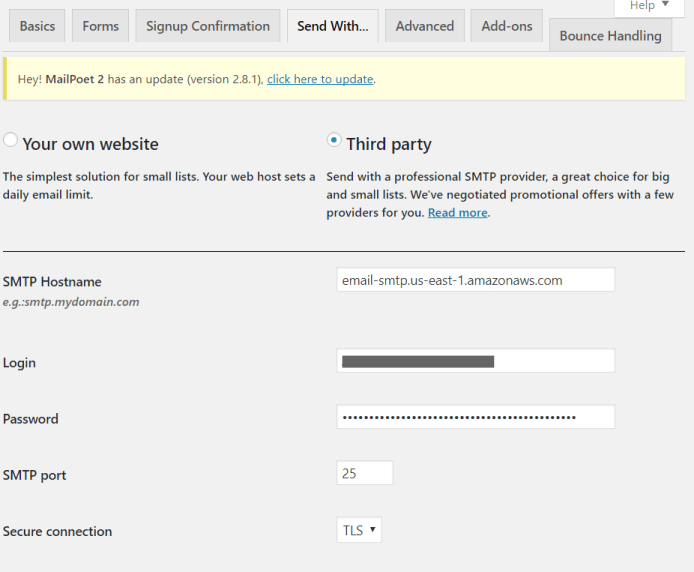
Step 4: Configure the “Send With” section in your Mailpoet dashboard.

- Select the Third Party button.
- In the SMTP Hostname section, enter the “Server name” provided in your SES dashboard under “SMTP settings.”
- In the same SMTP section of your SES dashboard, click “Create SMTP” credentials. This will provide the username and password which you will enter into the Mailpoet slots for “Login” and “Password.”
- Select Port 25, 465 or 587, Secure Connection “TLS” (Amazon recommends TLS), and Authentication “Yes” in the Mailpoet dashboard.
Step 5. Send a test email. There are a couple ways of doing so:
- Verify and send an email to what Amazon calls a “To” email address (e.g., your personal email ). You can set-up and verify a To email in the same way you set up your “From” email address (i.e., Identity management > Email addresses).
- Or, use Amazon’s mailbox simulator.
Step 6. Determine / configure your bounce / complaint handling process
If you have a large email list and need automatic bounce handling, simply move over to Mailpoet’s “Bounce Handling” tab and set things up there (instructions here). If you have a smaller email list, you can probably handle the bounces yourself. If this is your plan, bounce forwarding is already enabled by default for the email addresses you’ve added in your Amazon dashboard (under Email Addresses > Notifications) so you needn’t do anything more. If you don’t want bounce notifications emailed to you, then you’ll need to use Mailpoet’s handling method or some other method.
Step 7. Leave Amazon’s “Sandbox.”
All new Amazon SES accounts are by default confined to Amazon’s “sandbox,” which means you can only send to addresses that you’ve added and verified in your Amazon account. To free yourself from the shackles of the sandbox, simply request to increase your sending limits. Part of this process requires you to outline your plan for bounce handling (see Step 6).
Step 8. Set Up DKIM.
At some point, you’ll also want to set up DKIM, which is a commonly used mode of email verification that will aid deliverability. To do so, click the email address you’ve added in Amazon SES then click DKIM. Amazon will then supply you with 3 values to enter into your CNAME DNS records. Once you’ve added the CNAME records, you can validate your DKIM set up with Amazon in the same place in your SES dashboard.
Step 9. Run a free test with Mail Tester.
Finally, you’ll want to test your set-up with Mail Tester to ensure it meets all the necessary validation requirements and to ensure good deliverability. You might also run a free test with GlockApps.
If you made it this far, congratulations, you’re home free!
Closing Remarks
While using WordPress, Mailpoet 2, and Amazon SES for email marketing may take a bit more set-up time on the front end, those with larger email lists will save a ton of money in the long run. I’ve been extremely happy with the low cost and solid deliverability rates for this set-up. I thus recommend it highly, especially if you’re a DIY type of person.
Related Resources:
Keys to Starting a Blog / Web Business
Mailpoet 2 WordPress Plugin (offsite)